

Automating Laravel Homestead On Windows
Vince Mitchell • January 5, 2017
laravel homestead bashNote: This post was originally on .dev
I recently switched back to running Windows from Ubuntu on my work computer. When I was running Ubuntu I used a fork of Laravel Valet which worked great. Now that I’m back on Windows I knew I wanted to setup Homestead again since I had issues running the Windows fork of Valet due to DNS configuration at my office.
I decided that I’d setup Homestead and try to automate creating a new site as much as possible. Since I’m becoming more and more familiar with the terminal I decided to use Git Bash to do most of my terminal work and it’s what I’ll be using to get this automated.
The Goal
My objective was to pull down a git repo (or install a new laravel project) and run a command that would do the following:
- Add a site entry to my Homestead.yaml file
- Add a database entry to my Homestead.yaml file
- Add a IP entry to my hosts file
- Re-provision my Vagrant Homestead box so the new entries are updated
How To Get There
Install Git, Vagrant, Homestead
These are obviously necessary for this tutorial. Each site has great instructions for each so I won’t cover that here.
Hosts File
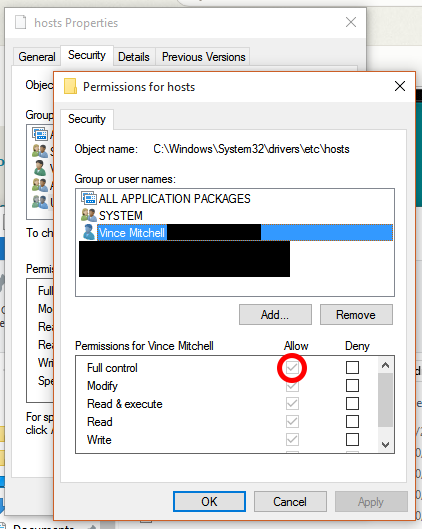
Windows doesn’t let you edit the hosts file (c:\windows\system32\drivers\etc) without authenticating. My solution was to give myself full control of the file. Just right click on the hosts file, go to security, click the edit button, click your username, and check the box in the ‘Allow’ column for Full Control.
Bash
Git Bash doesn’t automatically create the .bashrc or .bash_profile file. So the first step for us is to create those files in your user folder (c:\users\[yourusernamehere]).
Once you’ve created those files we’ll want to edit the .bashrc file. I’ve created a function that does all the work for me. You’ll need to change my username (vlm) with yours. But the two functions below will allow the magic to happen.
hsp(){
    cd "/c/Users/vlm/Homestead"
    vagrant provision
}

hsadd(){
    curfolder=${PWD##*/}
    echo "192.168.10.10 ${curfolder}.dev" >> "/c/Windows/System32/drivers/etc/hosts"
    sed -i "/sites:/a \ \ \ \ - map: ${curfolder}.dev\r\n\ \ \ \ \ \ to: /home/vagrant/code/${curfolder}/public" "/c/Users/vlm/.homestead/Homestead.yaml"
    sed -i "/databases:/a \ \ \ \ - ${curfolder}" "/c/Users/vlm/.homestead/Homestead.yaml"
    hsp
}
Usage
So at this point you’ve gotten everything setup and now it’s time for the magic. Here is the process you’ll use:
- Pull down your repo or create a new project
- Change into that new directory
- Run hsadd
Yep, that is it! You can open up your Homestead.yaml and hosts files and see the entries.
P.S.
I also use two other functions in my bash.rc file to make things go faster. One is a function that starts up my homestead box, and the other is just a quick alias for Sublime Text so I can open it from the command line using subl. Here is my full .bashrc file:
hs(){
    cd "/c/Users/vlm/Homestead"
    vagrant up
    vagrant ssh
}

hsp(){
    cd "/c/Users/vlm/Homestead"
    vagrant provision
}

hsadd(){
    curfolder=${PWD##*/}
    echo "192.168.10.10 ${curfolder}.dev" >> "/c/Windows/System32/drivers/etc/hosts"
    sed -i "/sites:/a \ \ \ \ - map: ${curfolder}.dev\r\n\ \ \ \ \ \ to: /home/vagrant/code/${curfolder}/public" "/c/Users/vlm/.homestead/Homestead.yaml"
    sed -i "/databases:/a \ \ \ \ - ${curfolder}" "/c/Users/vlm/.homestead/Homestead.yaml"
    hsp
}

alias subl="\"/c/Program Files/Sublime Text 3/sublime_text.exe\""